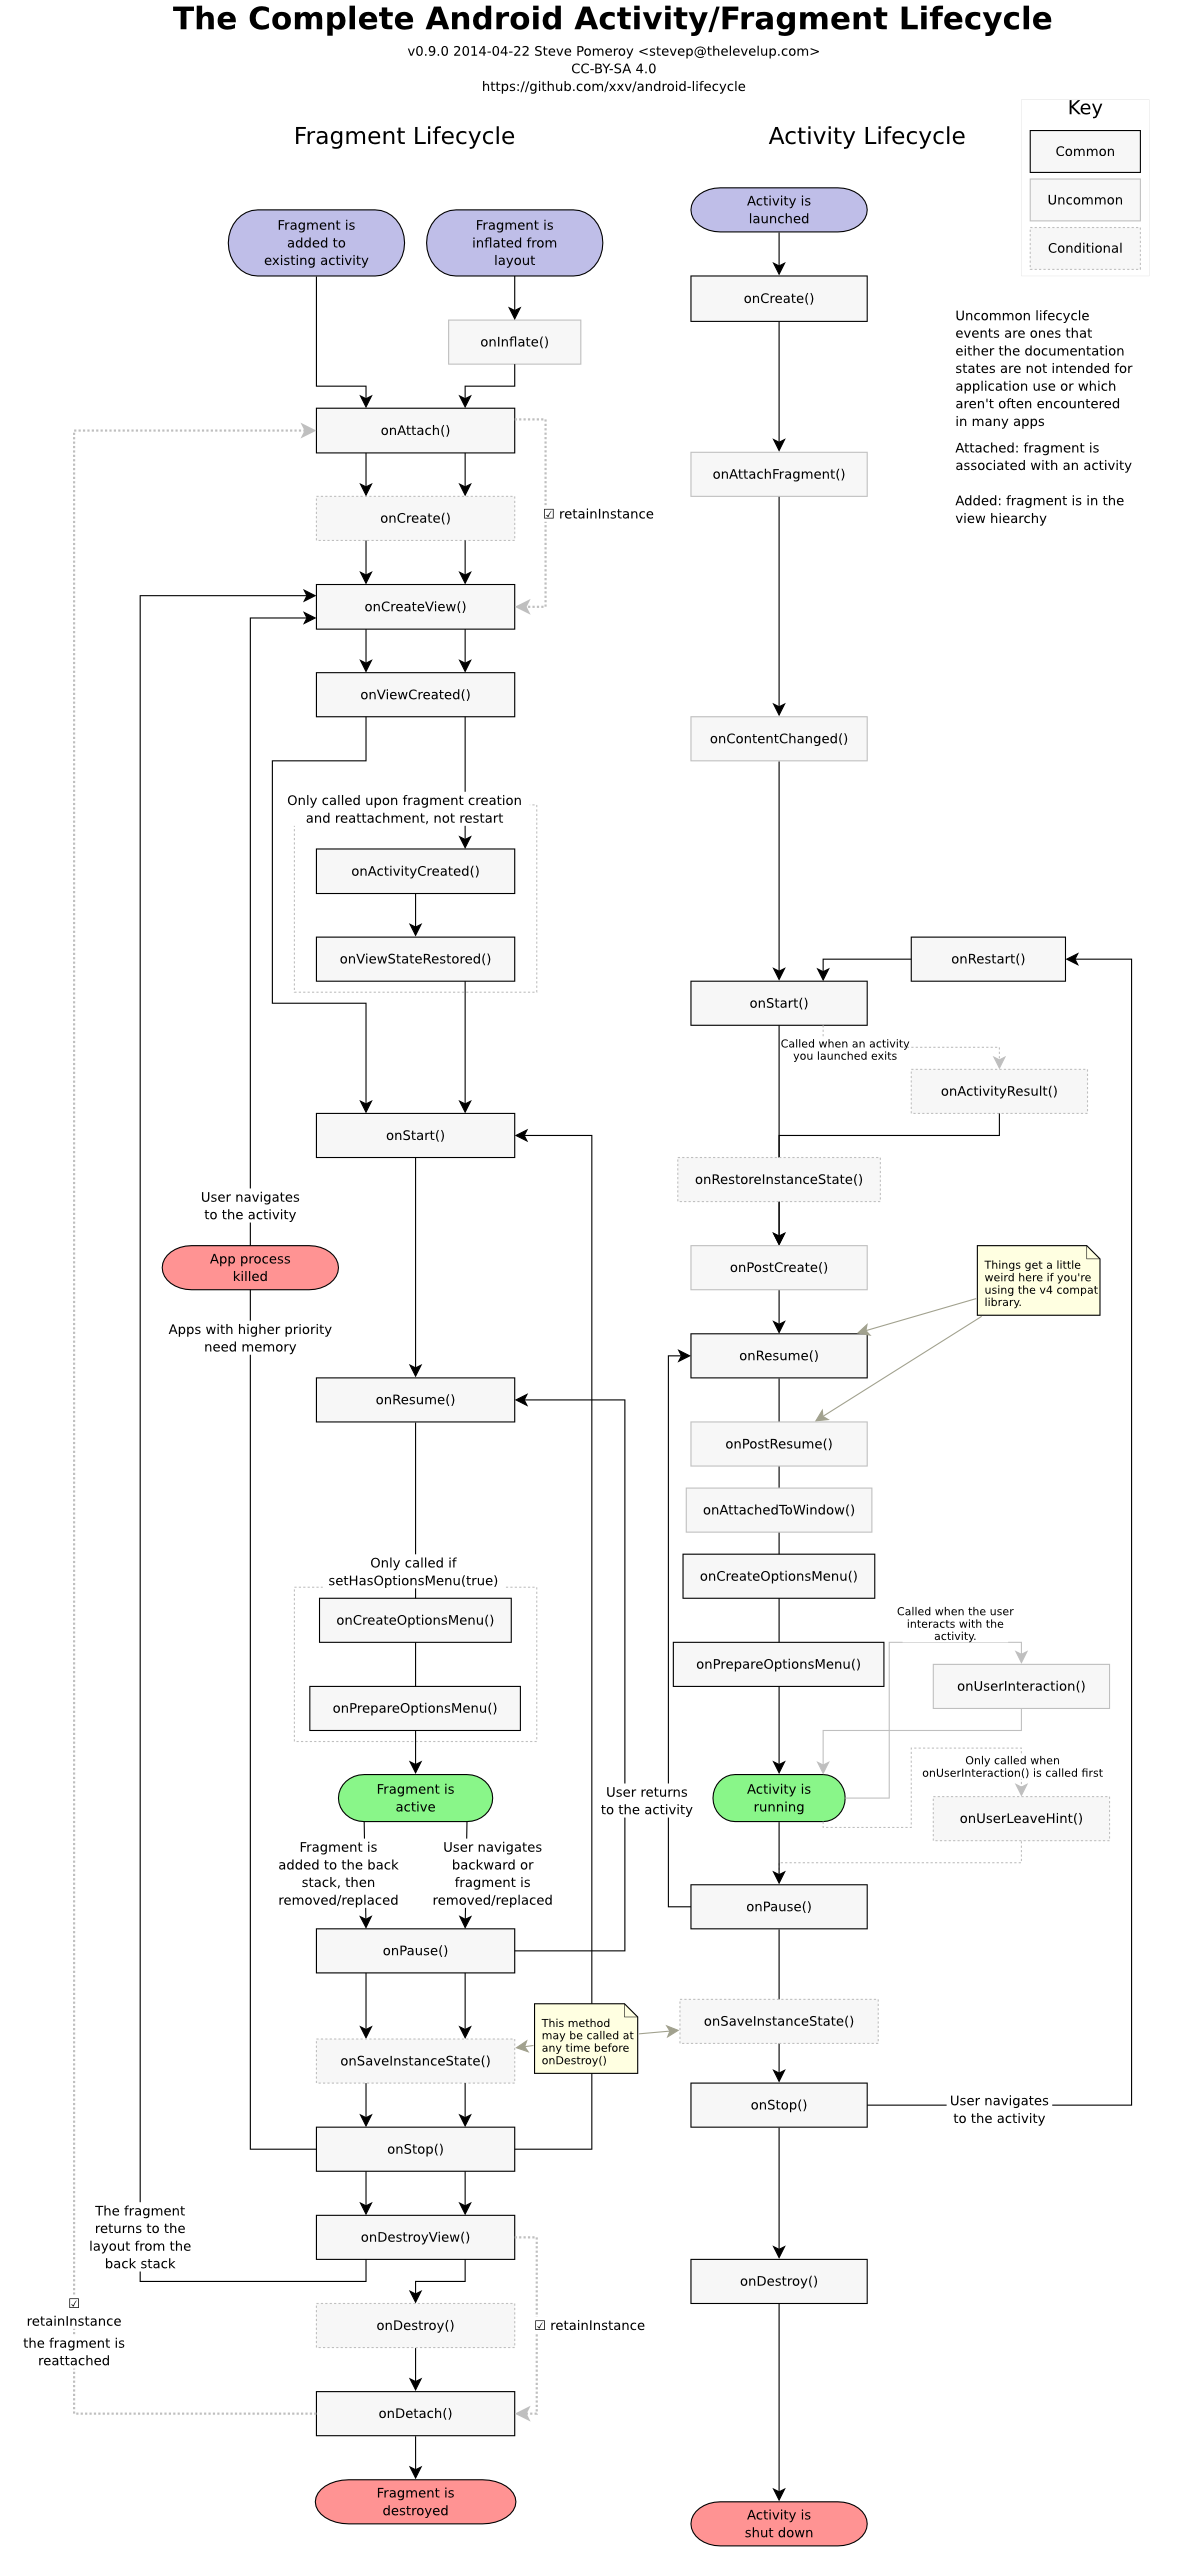
Architecting Android…The evolution
本文为翻译,在原文的基础上略有改动
http://fernandocejas.com/2015/07/18/architecting-android-the-evolution/
在开始之前,你最好阅读过这篇文章 ( http://xuyushi.github.io/2016/07/19/Android%20clean%20architecting/ )
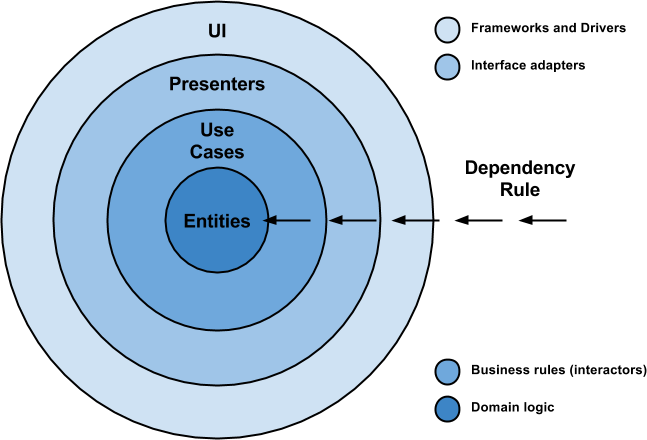
Android clean architecting
更多 Android 博文请关注我的博客 http://xuyushi.github.io
本文为翻译,在原文的基础上略有改动
http://fernandocejas.com/2014/09/03/architecting-android-the-clean-way/
volley源码解析
总体框架
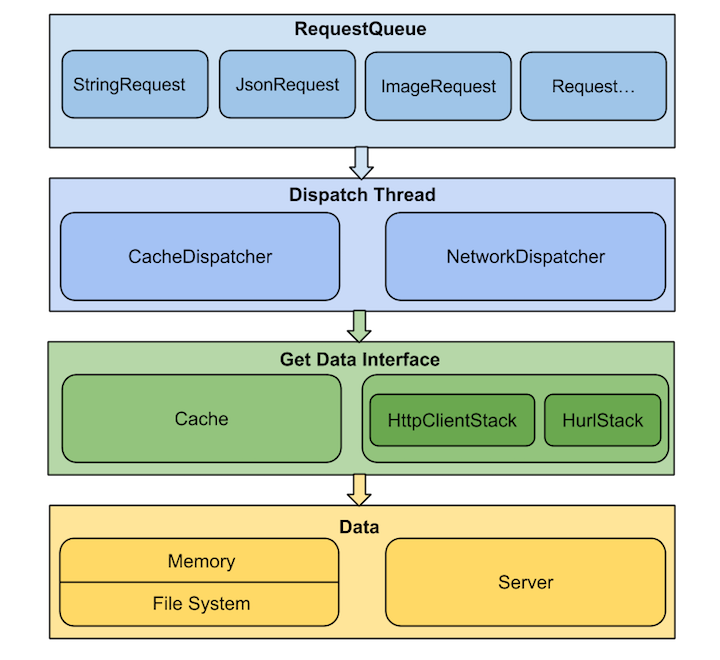
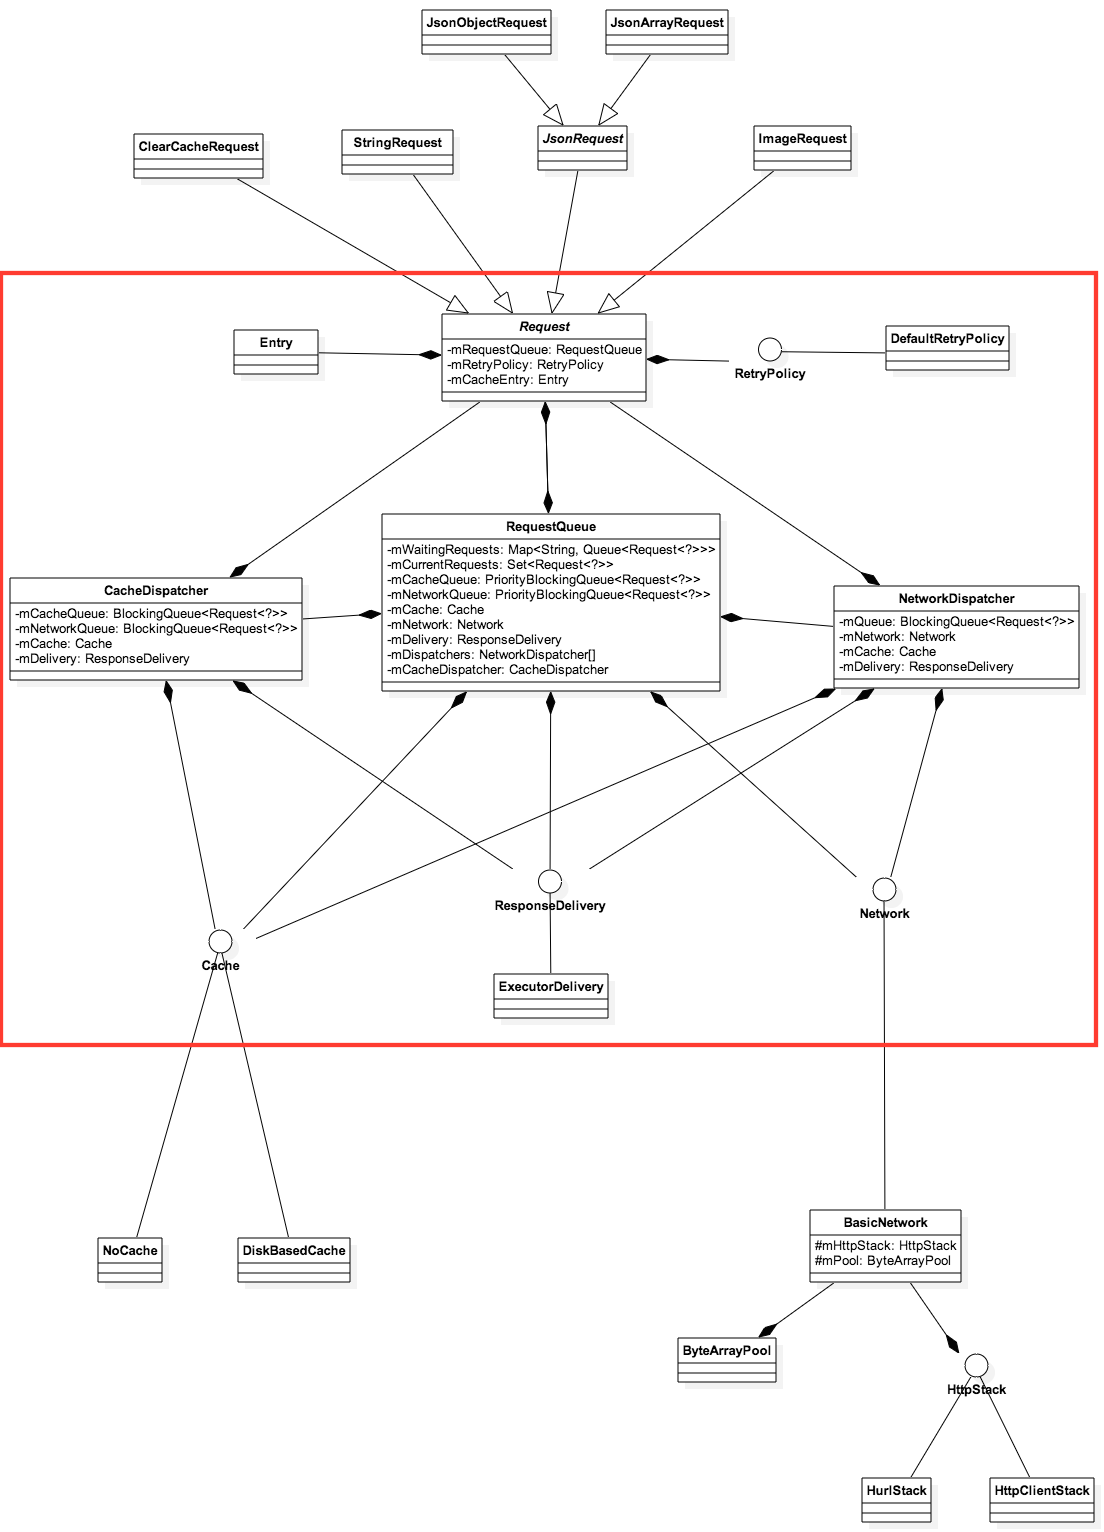
上面是 Volley 的总体设计图,主要是通过两种Dispatch Thread不断从RequestQueue中取出请求,根据是否已缓存调用Cache或Network这两类数据获取接口之一,从内存缓存或是服务器取得请求的数据,然后交由ResponseDelivery去做结果分发及回调处理。
- Volley:Volley 对外暴露的 API,通过 newRequestQueue(…) 函数新建并启动一个请求队列RequestQueue。
- Request:表示一个请求的抽象类。StringRequest、JsonRequest、ImageRequest 都是它的子类,表示某种类型的请求。
- RequestQueue:表示请求队列,里面包含一个CacheDispatcher(用于处理走缓存请求的调度线程)、NetworkDispatcher数组(用于处理走网络请求的调度线程),一个ResponseDelivery(返回结果分发接口),通过 start() 函数启动时会启动CacheDispatcher和NetworkDispatchers。
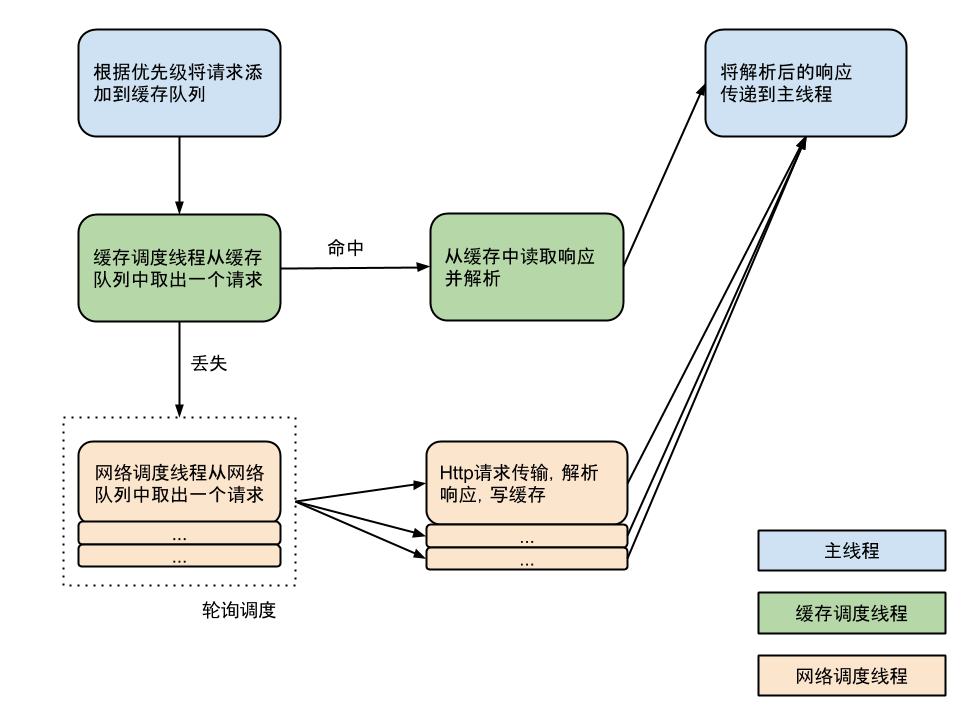
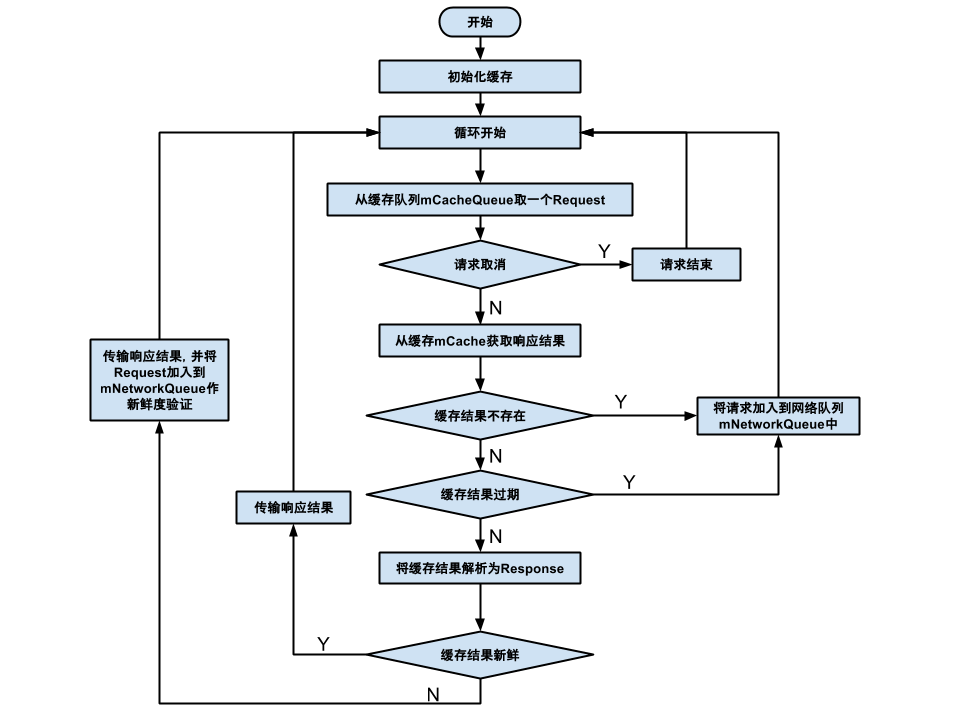
- CacheDispatcher:一个线程,用于调度处理走缓存的请求。启动后会不断从缓存请求队列中取请求处理,队列为空则等待,请求处理结束则将结果传递给ResponseDelivery去执行后续处理。当结果未缓存过、缓存失效或缓存需要刷新的情况下,该请求都需要重新进入NetworkDispatcher去调度处理。
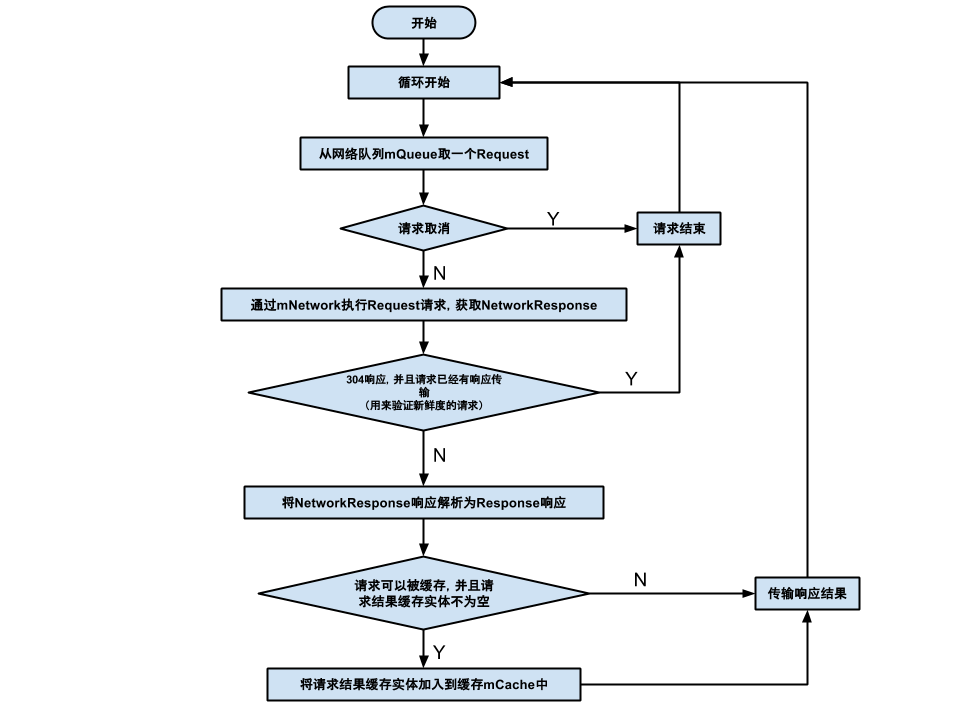
- NetworkDispatcher:一个线程,用于调度处理走网络的请求。启动后会不断从网络请求队列中取请求处理,队列为空则等待,请求处理结束则将结果传递给ResponseDelivery去执行后续处理,并判断结果是否要进行缓存。
- ResponseDelivery:返回结果分发接口,目前只有基于ExecutorDelivery的在入参 handler 对应线程内进行分发。
- HttpStack:处理 Http 请求,返回请求结果。目前 Volley 中有基于 HttpURLConnection 的HurlStack和 基于 Apache HttpClient 的HttpClientStack。
- Network:调用HttpStack处理请求,并将结果转换为可被ResponseDelivery处理的NetworkResponse。
- Cache:缓存请求结果,Volley 默认使用的是基于 sdcard 的DiskBasedCache。NetworkDispatcher得到请求结果后判断是否需要存储在 Cache,CacheDispatcher会从 Cache 中取缓存结果。
流程图
详细设计
类关系图
RequestQueue 构造方法
实例化 RequestQueue 的方法,有以下几个
public static RequestQueue newRequestQueue(Context context, HttpStack stack, int maxDiskCacheBytes)
public static RequestQueue newRequestQueue(Context context, int maxDiskCacheBytes)
public static RequestQueue newRequestQueue(Context context, HttpStack stack)
public static RequestQueue newRequestQueue(Context context)
最终都会调用到下面这个方法
public static RequestQueue newRequestQueue(Context context, HttpStack stack, int maxDiskCacheBytes) {
    //创建出缓存目录
        File cacheDir = new File(context.getCacheDir(), DEFAULT_CACHE_DIR);

        String userAgent = "volley/0";
        try {
            String packageName = context.getPackageName();
            PackageInfo info = context.getPackageManager().getPackageInfo(packageName, 0);
            userAgent = packageName + "/" + info.versionCode;
        } catch (NameNotFoundException e) {
        }

    //如果外面没指定stack 那么安装默认,根据 sdk 的版本决定
        if (stack == null) {
            if (Build.VERSION.SDK_INT >= 9) {
                stack = new HurlStack();
            } else {
                // Prior to Gingerbread, HttpUrlConnection was unreliable.
                // See: http://android-developers.blogspot.com/2011/09/androids-http-clients.html
                stack = new HttpClientStack(AndroidHttpClient.newInstance(userAgent));
            }
        }
        //注意
        Network network = new BasicNetwork(stack);

        RequestQueue queue;
        //更具最大缓存大小实例化出,RequestQueue
        if (maxDiskCacheBytes <= -1)
        {
            // No maximum size specified
            queue = new RequestQueue(new DiskBasedCache(cacheDir), network);
        }
        else
        {
            // Disk cache size specified
            queue = new RequestQueue(new DiskBasedCache(cacheDir, maxDiskCacheBytes), network);
        }

        queue.start();

        return queue;
    }
在最后调用了 queue.start();
 public void start() {
        stop();  // Make sure any currently running dispatchers are stopped.
        // Create the cache dispatcher and start it.
        mCacheDispatcher = new CacheDispatcher(mCacheQueue, mNetworkQueue, mCache, mDelivery);
        mCacheDispatcher.start();

        // Create network dispatchers (and corresponding threads) up to the pool size.
        for (int i = 0; i < mDispatchers.length; i++) {
            NetworkDispatcher networkDispatcher = new NetworkDispatcher(mNetworkQueue, mNetwork,
                    mCache, mDelivery);
            mDispatchers[i] = networkDispatcher;
            networkDispatcher.start();
        }
    }
这里先是创建了一个CacheDispatcher的实例,然后调用了它的start()方法,接着在一个for循环里去创建NetworkDispatcher的实例,并分别调用它们的start()方法。这里的线程数量可以自己定义
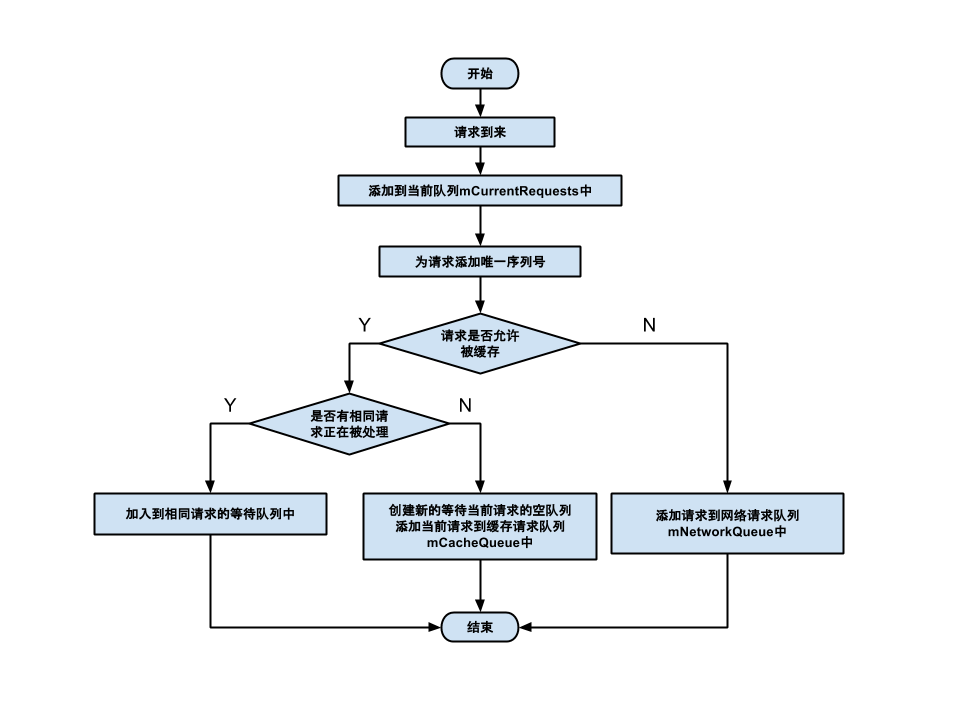
调用 add方法可以将网络请求加入队列中
public <T> Request<T> add(Request<T> request) {
        // Tag the request as belonging to this queue and add it to the set of current requests.
        request.setRequestQueue(this);
        synchronized (mCurrentRequests) {
            mCurrentRequests.add(request);
        }

        // Process requests in the order they are added.
        request.setSequence(getSequenceNumber());
        request.addMarker("add-to-queue");

        // If the request is uncacheable, skip the cache queue and go straight to the network.
        if (!request.shouldCache()) {
            mNetworkQueue.add(request);
            return request;
        }

        // Insert request into stage if there's already a request with the same cache key in flight.
        synchronized (mWaitingRequests) {
            String cacheKey = request.getCacheKey();
            if (mWaitingRequests.containsKey(cacheKey)) {
                // There is already a request in flight. Queue up.
                Queue<Request<?>> stagedRequests = mWaitingRequests.get(cacheKey);
                if (stagedRequests == null) {
                    stagedRequests = new LinkedList<Request<?>>();
                }
                stagedRequests.add(request);
                mWaitingRequests.put(cacheKey, stagedRequests);
                if (VolleyLog.DEBUG) {
                    VolleyLog.v("Request for cacheKey=%s is in flight, putting on hold.", cacheKey);
                }
            } else {
                // Insert 'null' queue for this cacheKey, indicating there is now a request in
                // flight.
                mWaitingRequests.put(cacheKey, null);
                mCacheQueue.add(request);
            }
            return request;
        }
    }
CacheDispatcher
NetworkDispatcher.java
参考
http://blog.csdn.net/guolin_blog/article/details/17656437
http://p.codekk.com/blogs/detail/54cfab086c4761e5001b2542
ASimpleCache缓存源码分析
ASimpleCache 是一个为android制定的 轻量级的 开源缓存框架。轻量到只有一个java文件(由十几个类精简而来)
仓库地址:https://github.com/yangfuhai/ASimpleCache
官方介绍
1、它可以缓存什么东西?
普通的字符串、JsonObject、JsonArray、Bitmap、Drawable、序列化的java对象,和 byte数据。
Copyright © 2015 Powered by MWeb, Theme used GitHub CSS.
